| Appearance | Name | Description |
|---|
 | Grunt |
The most common of Lord Zordaf's minions falls to a single rocket
and is largely considered expendable. Don't get the wrong idea, though--grunts can give you surprisingly
large amounts of trouble when they attack in packs, especially if their weapons are augmented.
When a grunt lacks a special weapon, it is restricted to using its shocking probes. But if a grunt is
given a projectile weapon, it can dish out anywhere from minor damage to massive mayhem. Mark carefully
the gun attached to its head!
|
 | Slicer |
These spinning saw blades on wheels deliver high contact damage to
everything they touch! Don't get close to a slicer, and be careful if you shoot them--their trajectories
ricochet off walls and cause even more damage. It will take at least three rockets to put them down.
Exercise caution whenever you see them!
|
 | Turret |
Turrets appear in many arenas. They tend to fire much more rapidly
than other robots, and they often possess a great deal of armor. Turrets can either move along overhead
rails or pop up from the floor. If they form a tower, each segment must be eliminated individually. Watch
them carefully before moving or shooting.
|
 | L1-Killer |
A higher-ranking robot from Lord Zordaf's minion pool. L1-killers
frequently move faster than grunts, dodge and lead shots more often, and have complex firing patterns.
Usually, a L1-killer will be equipped with a vulcan cannon, but some have even deadlier weapons.
|
 | L2-Killer |
These assassins appear occasionally to duel with life-forms that believe themselves too good for
the first tier of killer robots. They know to keep moving to escape your rockets. They also pack
a wide variety of weapons that can be swapped in and out at any time. Whether they roll in through
doors or coast along rails, they always mean trouble.
|
 | Tank | CLASSIFIED
|
 | Cabler | CLASSIFIED
|
 | Mole Bot | CLASSIFIED
|
 | Winder | CLASSIFIED
|
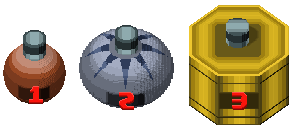 | Countdown Bombs |
These infrequently drop after an important event in a stage,
usually after defeating a tough robot. Successive sizes have longer countdowns and deadlier blasts. Their
appearance is usually your cue to leave the stage (if you can).
If you want, you can try to shoot these bombs...at the risk of early detonation. But why in the world would
you ever want to do that...?
|
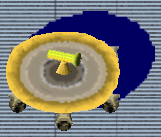 | Height Shortener |
A souped-up version of a slicer, it takes much more damage
and fires a triple spread gun. If you get cornered, you're screwed. Rocket jumps might just be the best
tactic you have, although the advantage is only temporary--Height Shortener is persistent!
|
 | Smartcart |
An armored train cart that rides rails and supports three weapons: rocket launcher, cluster shot, and
vulcan cannon. You'll have to aim where it is going, not where it is, if you expect to defeat it.
Oh, and it might be a good idea to step out of the way!
|
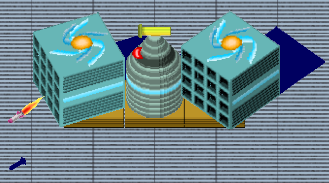 | Big Rack |
A tank boss with a five-shot spread gun and two massive missile
launchers at either side. Your own rockets will only scratch this foe, and this is a foe that doesn't take
kindly to being scratched. At all costs, make sure you are nowhere to be found when the missile racks are
pointed in your direction!
Big Rack does have one important weakness--can you find it?
|
 | A-Train |
This armored train engine pulls multiple smartcarts and does not stop for anybody, especially not you.
Mind the grenade and super rocket launchers on its roof, and be wary of making it angry--it speeds up
when damaged too much.
If only there were a way to derail the carts...
|
 | Pinky | CLASSIFIED
|
| Light Shower | CLASSIFIED
|
| Spinnistar | CLASSIFIED
|
| Dark Shark | CLASSIFIED
|
| Discombobulator | CLASSIFIED
|
| Thunder Dart | CLASSIFIED
|
| Planet Buster | CLASSIFIED
|
| Lord Zordaf | CLASSIFIED
|






